Pages

Sunday, December 23, 2012

DIY Wall Art With Your Welcome Mat

Since moving into our new home just a little over a year ago, I've been going room by room focusing on painting, decorating and improving our space.  Anyone who has ever bought a new house knows how expensive those first few years can be so I turned to Pinterest for some DIY inspiration.

I found this pin from Our Family Four and I was IN LOVE with the original pinner's end result.  It looked unique and it fit perfectly with the room I was focused on.  The pin had fairly detailed instructions so I thought it would be an easy project.   

DIY Wallart from Our Family Four's Blog
Photo from Our Family Four's blog post

I bought a mat from Target on clearance for $7,  two pieces of wood from Lowe's for around $30 and then I used stain and spray paint we already had at home.  So I it was roughly $40 to start.  A little more than I'd typically spend on a DIY stuff but I loved the project so much I didn't mind. 

My husband stained the wood and taped off the edges for me.  Then I placed the mat in the middle and sprayed away!  I let it dry in between each coat and did 4 coats total. I was so excited to pull the mat back and see the end result...imagine my disappointment when it look TERRIBLE!  

The lines were not clean, the paint had smudged in places and overall the pattern of the mat just wasn't has nice as the original pinner's.  I sited heavy coats of paint and my mat pattern as the problem in my first stab at this project.

Determined to have this in my living room, I invested in a new mat, another $20 at Target.  I flipped the boards over and taped them off again.  Before starting, I went back to the original blog and read the directions again.  In my first attempt, I missed that the original pinner had taken an exacto knife and cleaned up the mat.  If you take a close look at your rubber mats you'll see that there is excess plastic throughout the lines of the design and it is jagged in places. When using it as a stencil it would make the lines less clean.  

I sat down with an exacto knife and trimmed all the excess plastic!  I can't even tell you how long this took...let's just say it's hours off of my life that I am never getting back LOL!  Anyway, again, I was vested in making this come to life so I went at it again.

This time, I did four light coats of spray paint and allowed more drying time in between.  I let it dry over night before I removed the mat.  I pulled back the mat and was yet again disappointed.  It was better than the first attempt but still not good enough for my living room wall. 

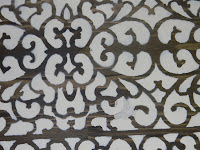
DIY Wallart my first attemptDIY Wallart my first attempt

DIY Wallart my first attempt

You can see even after all my exacto work, the lines still weren't overly clean and despite the added drying time, paint still smudged. Overall it just didn't look that impressive. I spent a lot of time and money on this project.  It was time consuming and after two failed attempts, I was out of wood and had to give up. So, even though I absolutely LOVED the original pinner's end result, I have to give this pin a PASS.  

In future posts, I'll recycle the wood and mat into other projects I seen on Pinterest.  Stay tuned!

From our family to yours, Merry Christmas and Happy New Year!


Thursday, December 20, 2012

Quick Christmas Treats

If you need a quick snack for your child's holiday party or just something for the upcoming holiday, try these delicious little treats!

Quick treats using pretzels, Hershey kisses and M & Ms


Originally found at House on Hilltop these were inexpensive and tasted great. For less than $10 I got everything I needed to make a batch of 80 and had enough supplies left over to make another batch.  I probably could have made them for even less had I planned ahead and found some coupons or went to a less expensive grocer.  

I followed the original Pinner's instructions by preheating the oven to 225 degrees, laying all my pretzels out in one layer on a cookie sheet, unwrapping Hershey Kisses and placing them on the top of each pretzel.  I put them in the oven for about 4 minutes.  When I took them out, the chocolate was soft enough that you could push an M & M into each one.  I put them in the fridge to help them cool, packed them up in little holiday bags and sent them off to school for my 3 year old's holiday party.  Everyone, including the teachers, enjoyed them.  Best part about it...it took less than a half hour from start to finish AND I had my little guy helping me!

Giovani putting together quick Christmas treats


One thing to note, the original Pinner used round pretzels.  I couldn't find them anywhere so I just used the square ones.  They worked just as well.  You could also use any color M & M's depending on the holiday or occasion. 

Overall this pin gets a big PIN from me!  I recommend you try them and make extras because you'll probably be sneaking a few!

Source: House on Hilltop (December 15, 2010), Our Favorite Christmas Treat. Retrieved from this link

Wednesday, December 19, 2012

Welcome to Pin or Pass!

Welcome to Pin or Pass!  I'm Jennifer Calero, Mom, wife, marketing professional and a self proclaimed Pinterest addict!  I've always been a creative person.  As a kid, I would much rather have made holiday decorations out of construction paper than go outside to play. With that in mind, it should come as no surprise that I love Pinterest and all it has to offer.

I love Pinterest because it let's me feed off of other people's creative ideas and translate them into something that will work for me. Since I got the bug about a year ago, I've been doing project after project.  I don't go a day without pinning.  Sad...maybe, LOL, but it's become my hobby.

Now, anyone that has ever tried anything from Pinterest knows that some projects turn out great and are very useful while others end up in the garbage can.  I've certainly had my share that ended up in the garbage, so I created Pin or Pass!  A place where my fellow Pinners can come to see what pins I've tried, how I went about them, what worked, what didn't, how much I spent and the end result.  At the end of each post, I'll rate the project Pin or Pass.  Pin for those ideas that are worth your time and money and Pass for those that were tough to bring to life.

A few disclaimers...I'm a not a good cook, so if I say Pass on a recipe that doesn't mean you should totally pass on it.  It's very possible I managed to screw it up as a result of my poor cooking skills :-) Next, if I say Pass on particular pin, I want to be very clear that I am not criticizing the original pinner's work or idea.  I'm simply saying it didn't work for me and here's why.  Feel free to learn from my mistakes and make it work for you.

I look forward to sharing all my Pinterest projects with you, so please follow me at Pin or Pass as I solve all of life's problems one pin at a time!

Up next...DIY Wall Art Project, Pin or Pass?

Coming soon...Pin or Pass on Facebook!