Pages

Tuesday, February 26, 2013

A Fireplace Makeover Inspired by Pinterest

The home decor section on Pinterest is killer!  There are so many great ideas and so many beautiful homes to  get inspiration from. When you have a room with a fireplace, it is often the focal point of the room and if the fireplace is old, dull and outdated...it's time for a fireplace makeover!  Our fireplace is the focal point of our family room and since we moved into our house about year and half ago, a fireplace makeover has been on my short list of projects.

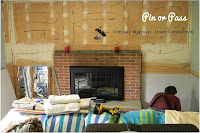
Here's why:
How cute is our little helper in his footie pjs with his toy drill?  He's ready to work!

I found inspiration in several places. Here are links to each to give you an idea of the direction I was headed.


Fireplace makeover idea

These first two were found on Centsational Girl's website and she doesn't really say whether they were done professionally or whether they were a DIY fireplace makeover.  The inspiration below came from DIY Show Off.  I think the name of the blog speaks for itself that this fireplace makeover was a DIY project.  


DIY fireplace makeover

So I clearly wasn't tackling this project on my own.  In fact, I will admit I didn't do anything for it except for design the look of it by picking out the paint and stone.  Other than that, my husband Chris and my Dad, a licensed Contractor*, did all the work.  

Here we are as it was a work in progress.  
Fireplace Makeover DIY Project


I'm not even going to attempt to give you step by step instructions on how this was done.  The third inspiration photo from
DIY Showoff provides instructions but as I said my Dad helped us do this and he is a Licensed Contractor.  The DIY fireplace makeover in the third photo looks good, but I am not sure we would have gotten the same result we got had my Dad not been involved and my husband is really handy and good at stuff like this.  So note to self, this probably isn't the best DIY project for a beginner in my opinion.

I took bits and pieces of each inspiration photo and incorporated them into our project.  I liked the clean look of the light colored book shelves in each photo.  I liked the green color and the stone that was used in both the Centsational Girl's photos. 

Anyway, after a month of working on it here and there, this is our end result!

DIY Fireplace Makeover
I love it!  Chris and my Dad did a great job.  I need to do a little bookcase styling, which I will be turning to Pinterest for help with and it will be complete!  Overall, I would recommend using Pinterest for inspiration on your fireplace makeover project.  The ideas I found turned this project into a big PIN, but proceed with caution...this may not be a DIY project for beginners and could turn your PIN into an expensive PASS! 

Fireplace Makeover Before and After
Fireplace Makeover - Before and After


*If you live in Buffalo, Niagara Falls, or any area within Western New York and would like more information on my Dad's company, visit his site, www.malfaconstruction.com.  Tell him Jenn sent you :-)!

Thursday, February 21, 2013

Making a Picture Frame Collage

As I've said in previous posts...I LOVE PICTURES!  My house is covered in pictures of my family but sometimes you can end up with too many frames lying around so I had to move my picture collection to the walls.  Hanging one frame here and there just wasn't going to work so I decided a picture frame collage was the perfect solution.  

I found inspiration in several places.  Here, at the fabuloushomeblog.com, there were a lot of ideas but in my opinion, they were a little too uniform.  Don't get me wrong, they all look nice, but I was looking for something a little more creative and different.  These were way too organized for how I'm rollin' these days, I guess you could call my life organized chaos :-)

Anyway, I really liked the way this pinner used different types of frames, not all the same and not all hung in perfect lines.  The shutters were a little too country for the style of my home, so I did my own variation.  

I bought frames from Hobby Lobby, Michael's and JoAnn Fabrics.  I pretty much went where ever they were selling for 50% off or where I had a coupon.  Here's my picture frame collage that now hangs in my living room.  

Picture Frame Collage

I spent less than $30 in new picture frames including the large one in the middle.  I had three frames to start.  I really like the way it came out, so the idea of a picture frame collage is a PIN for me! 

But as our family is growing, I'm really debating on whether or not I should add more frames around the large frame in the center.  There is enough space that I could fit some 4 x 6 frames. What do you think?  Should I add more to my picture frame collage or leave it as is?  

Sunday, February 17, 2013

How to Clean a Microfiber Couch

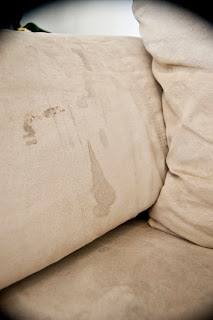
How to Clean a Microfiber Couch - Before PictureI'm embarrassed to admit that is my couch.  It was once a very nice couch until two little people entered my house.  Since, it has become a magnet for spills and spit up.

I've had it professionally cleaned several times.  Each time I was content with the results but not happy.  Stains still remained and at $75 to $100 a cleaning, it just wasn't worth it.

For a while I just gave up.  I figured we'd just keep it until spills and spit up ended in our house and then we'd buy a new one.  Well anyone who knows me knows that thought was short lived because there is no way I'd invite a guest in to sit on this disgusting disaster.  It's MY kid's mess and I even hate sitting on it!

So when I came across a pin from 551 East, I one, didn't feel so bad anymore because someone else's couch was as disgusting as mine and two, couldn't wait to try this for myself.  Here's her before picture.

How to Clean a Microfiber Couch - Before

I followed her instructions exactly.  I went to the Dollar Tree and bought rubbing alcohol, a spray bottle and a white bristle brush to use.  I actually bought a pedicure brush that was meant for nail cleaning because that's all they had with white bristles.  Then I went to Target and got sponges that were the same color as my couch as she recommends.  With my couch being so light I bought the Scotch Brite sponges that are made from recycled material and have a beige tone to them.

From there, I filled the spray bottle with pure alcohol and soaked the cushions as you see here.  

How to Clean a Microfiber Couch

Once it was saturated, I took a dry sponge and scrubbed.  You need to put a little "elbow grease" in to it, but nothing major.  As you are scrubbing the sponge will start to get dirty and saturated as well.  I used about two dry sponges per cushion.  Once you have scrubbed and scrubbed, let it dry.  Here is the end result after it dried.


Not bad right?!?  If you look closely you can see there are two spot that didn't come completely out but I think a second run through the process would remove them.  Truthfully, I'm not going to bother because it is going to need a total cleaning again in a week, so I'll just wait until then :-).

The original pinner recommended you take the white bristle brush to refluff the couch after it dried.  I didn't need to use it.  Mine looked ok with just letting it air dry.  One thing to keep in mind, the room and couch will smell like alcohol for a bit.  If you can open a window that would help, but in the winter, in Buffalo, New York that wasn't an option so I just in the other room for a bit.  Not to worry it will go away within a few hours.  

The good news is, I wouldn't be embarrassed for someone to sit on my couch now and instead of $100 to clean it, I did for about $5!!! This is a definite PIN for anyone with a Microfiber Couch and messy kids!

Monday, February 11, 2013

DIY Wall Art - What a Difference A Day Makes

Everything I do from Pinterest is mainly for my family in some way shape or form even though they may not realize it when it comes in the form of a DIY wall art project :-).  When I saw this project I thought it was a really cute way to showcase the history and making of our family as it is today.  I found the original idea on Sweet Little Loving's.


Now, I am by no means a graphic designer but I used Microsoft Publisher to lay my picture out.  I could be wrong but I think creating this in a simple Word document might be difficult as you really need to make sure that things line up properly.  Any way, in Publisher I turned on the grid and ruler function.  I selected three fonts, Castellar for the numbers, Clipper Script for the names and Modern No. 20 for the sentence at the bottom.  

Although I really like the lines she used on each side of her names, I couldn't get mine to look as nice so I left them off.  I also couldn't turn my writing the way she did with the word "day" in the last sentence so I just made it blue to highlight it a bit.  From there, I put a border around the entire thing and printed it on resume paper.  

Here's my end result!
DIY Wall Art

DIY Wall Art


 If I had to do over again, I'd twist the leg of one of my graphic designer friends and have them help me lay this out so I could have the lines the way the original poster did next to everyone's names.  I'd also add the detail to the word "day" as the original poster did.  But for just having basic graphic design skills and it just being a quick DIY project, I'm ok with the way it came out.

As for supplies, I had the resume paper and the frame was on sale at Michael's for $6.  So, I did this whole project for $6, it was relatively easy and not too time consuming.  Best of all, it gave me another piece of inexpensive DIY wall art to add to my living room so this project gets a PIN.  

And now that you all know my birthday, I'll be expecting gifts :-)  Just kidding...up next, Spring cleaning is just around the corner so I'm going to tackle my Microfiber couch and try to get the stains out with DIY cleaning post I found on Pinterest. Organizing with Pinterest ideas is upcoming too so stay tuned!  If you haven't already please subscribe to Pin or Pass so you don't miss any of my posts!   

Saturday, February 2, 2013

A Fun Way to Hang Your Picture Frames

If you're anything like me, I have a million pictures all around my house.  I LOVE pictures!  So when I saw this idea originally from Pottery Barn, I had to give it a try.


Now, Pottery Barn sells these for $24.00 each!  No way was I paying that, so I went to Hobby Lobby, with my 40% off coupon in hand and found my own.  I picked two distinctly different knobs just to jazz it up a bit but you could use two of the same if you don't want to mix it up.  If you don't have a Hobby Lobby, most home improvement centers have knobs you could use.

I bought two picture frames from Michael's that had the ribbon already attached.  They were on sale for 40 or 50% off so they were only a few dollars each.  It would be easy to attach your own rope, ribbon or chain if you had picture frames already that you wanted to use.

I had to enlist the help of my husband to install these.  I was thinking you'd just screw them in the wall and be done with it, but no.  If you are hanging your pictures on a part of your wall that doesn't have a stud behind it, you'll need to use a toggle hook to put these up.  If you have specific questions about how to do that, email me and I can ask Chris (my husband).

Here's the end result, two beauties hanging in my bathroom!


Door knobs as picture frame hangersDoor knobs as frame hangersDoor knobs as picture frame hangers

The door knobs were around $7 with coupons and the frames were under $10 for both.  They were relatively easy to install if you have someone that knows how to use a toggle hook :-) so this project gets a PIN for being easy, inexpensive and producing a good final product!