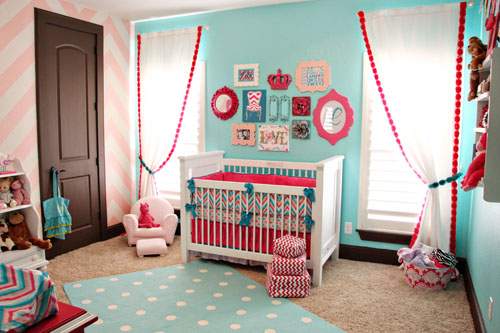
Showing posts with label baby girl nursery ideas. Show all posts

Monday, March 25, 2013

A Baby Girl Nursery - Pinterest Style Part 3

Welcome to the last of my 3 part series, a baby girl nursery, Pinterest style!  In today's post I am going to cover the last two major projects I did for her room, a dresser makeover and a tutu table.  Let's start with my inspiration:
Originally found at Real Simple
DIY dresser makeover
Originally found at Good Bye House, Hello Home

Let's start with the dresser.  Now, I will tell you up front, much like our fireplace makeover I didn't have much to do with the manual labor on this project, I was the Visionary :) and Chris (my husband) did the hard stuff!  The dresser we got was handed down from his Mom.  It was a very high quality piece of furniture but it was a blonde stain.  Not going to work with our color scheme at all, so Chris started sanding!  He sanded it down quite a bit to get all the lacquer off.  From there, we primed it using regular paint primer.  Then he went over with 4 (or 5 I lost track) coats of white paint.  We spray painted the handles hot pink to match everything else in the room and after a lot of dry time, here is our end result!

DIY dresser makeover white with hot pink hardware

I am very happy with the way it came out.  Since the dresser was free, the only thing we had to buy was paint so it was inexpensive to do this dresser makeover.  To dress it up a bit more, I took the left over scrapbook paper I had from the DIY wall art project and made a mat to put underneath the glass on top.  Here's a the finished product. 

DIY dresser topper

I love the end result of this project.  I think it looks really cute and she'll be able to use it as she grows.  Plus if she ever wants to change the color scheme in her room the handles are easy enough to repaint.  If I had to do all the manual labor on this, it would probably be getting a PASS because he put a lot of time into doing all the coats, but since I didn't :-)  this project gets a PIN!

Onto the tutu table...I LOVE the tutu table.  Who am I kidding, I love all things tutu.  I'd put her in one everyday if I could!  When I saw the idea to make one out of a table I had to do it.  I got a $20 white table from Ikea and sprayed it...you guessed it, hot pink.  Then I got black tulle and lime green trim to accent the edges with.  My originally thought was I was going to hot glue the tulle along the inside lip of the table top.  Well when I sat down to put it together I quickly realized that wasn't going to work.  The tulle wouldn't stick to the table that well and it wouldn't bunch up nicely, so I had to enlist the help of none other than my Grandma D.  Now, a quick side note on Grandma D...she is the Craft Queen.  She can do it all, knit, crochet, paint, create, you name it, she can do it.  So when ever I have a project emergency, I go to her for help.  

Anyway, I took all my supplies to her and she used some elastic to string the tulle together.  Then she sewed the trim along the top of the tulle so it almost looked like a Hula skirt made from tulle.  From there, we hot glued the skirt to the edge of the table.  Here's the end result.


I don't love it.  In fact, I don't even really like it, but it's fine for now.  I needed way more tulle to make the skirt fuller.  I should have either went a little shorter or took the tulle all the way to the floor because I feel like this length looks awkward.  I like the lime green edging but it doesn't stay well on the table.  Since the table is metal, it is hard to get things to stick to it.  If I had to do over again, I would have found an old wood table, repainted it and stapled the tulle to the inside making the changes to length that I just mentioned.  Not including the cost of the table itself, I spent over $20 in supplies using coupons.  I think using a wood table and using more tulle would have made the outcome better but then it would have been even more expensive so while it breaks my heart to say it, the tutu table gets a PASS!

I had a lot of fun doing her nursery!  I think everything came out really well with the exception of a few projects I'd pass on, if I had to do it again.  Here's a a few overall photos, hope you enjoyed my baby girl nursery, Pinterest style series!

Pinterest inspired baby girl nursery

Pinterest inspired baby girl nursery

Pinterest inspired baby girl nursery

Pin It

Thursday, March 21, 2013

A Baby Girl Nursery, Pinterest Style - Part 2

In today's post I am going to focus on two things I did for the walls in my daugther's room, who which by the way is of course waking up from her nap early because I sat down to write a post :-)  I think they have radar.  Anyway, aside from the collage above her crib which I featured in my first post, I didn't have any thing for her walls so I turned to Pinterest to find some things to make.

Here was my inspiration:

DIY Wall Art
Original from It's doable...Crafts, food and life.
DIY wall art
Originally from Literally Inspired
Let's start with the flower project on top.  I thought this looked really cool and I also liked it because you can choose what ever color scrapbook paper you want so it was really easy to customize to the room.  Again, this project was done pre-Pin or Pass so I don't have before photos, but I went to the craft store and bought a canvas and about 10 sheets of scrapbook paper.  After coupons and sales I probably spent about $10 on this and I didn't need all that scrapbook paper, probably only about 5 sheets total.

I followed the instructions the original Pinner provided and I started by painting my canvas with a silver background color.  While it dried, I cut all the leaves out.  Once the leaves were cut I laid them out in the pattern to get an idea of where to place them.  From there, I used craft glue to glue the leaves on.  This is where I went wrong.  The glue was a little too heavy and some of the leaves didn't lay as flat as they should have.  Once all the leaves were on and dry, I went over it with a coat of Matte finish Modge Podge.  This made the bumps in the leaves from the glue stick out even more!  You can't see it when it's hanging on the wall, but if you look closely you can see them.

Here's my end result:

DIY wall art
 
If you look closely, you can see what I am talking about with some of the leaves being bumpy.  I also wasn't really happy with the way the flower itself came together.  The original Pinner got her leaves in a much tighter pattern and I think it looked nicer.  While this project was easy and inexpensive, I don't LOVE my end result, so if I had to do it over again, I wouldn't!  I give this pin a PASS.

My second DIY wall art project was much more successful.  For this one, I took another canvas and photo of Julianna.  I got a poster size print from Walmart for $5!  I got it about an inch or two larger than the canvas all the way around the perimeter of the picture.  I painted the edges of the canvas hot pink (of course!) and used some craft glue to glue the picture down.  The graft glue worked fine for this project because photo paper is a lot heavier than scrapbook paper.  I glued the photo to the canvas and used an exacto knife to trim the excess off around the edges.  I used a sanding block to smooth the edges.  I know I thought it sounded crazy too but that's what the original Pinner said to do to clean up the edges so I tried it and it worked!  From there, I used Modge Podge on top to give it a textured look.  The original Pinner recommended another product to go over top, but Modge Podge worked fine for me.  Here my end result:

DIY wall art

I was happy with the way this one came out!  Of course it doesn't hurt that she's a doll :-)  For less than $10 this project was complete.  It was easy and came out as expected, this one gets a PIN!

Up next...in the final part of my baby girl nursery series, I'll review her dresser re-do and her tutu table!  Stay tuned.

Tell me, what do you think so far?

Pin It

Monday, March 18, 2013

A Baby Girl Nursery, Pinterest Style - Part 1

When I found out my second child was a girl, I was SO happy!  Don't get me wrong, I love having a little boy too.  Although I will admit, when I first found out he was going to be a boy I was a little nervous because I wasn't sure what do with a boy.  You can't paint their nails or get their ears pierced or buy them tutus!  But, it turns out boys are pretty cool too and I wouldn't trade him for the world!  I digress, regardless of how cool he turned out to be, boy stuff is not as fun as girl stuff.  There isn't as many options and everything looks the same so when I found out Julianna was on the way, I couldn't wait to get started on a baby girl nursery inspired by Pinterest!

I had just really gotten the Pinterest bug when I started planning.  Pin or Pass wasn't even a thought yet so unfortunately I don't have any before and after photos, just finished products.  Getting started I knew I wanted something different.  I didn't want the typical pale pink with butterflies kind of thing.  That theme for a baby girl nursery is very cute, just not me.  I'm more of a animal print/hot pink kind of person :-).

Over the course of a few posts, I will go over all the projects I did for her room.  Let's get started with the focal point of her room, the crib with a collage above it.  Here's my inspiration.

baby girl nursery
Originally found at Project Nursery

nursery wall decor
Originally found at Lilly Cakes

DIY nursery wall decor
Original site is no longer available
Originally found at Small Chic Home

So after seeing all of these I selected a color scheme.  I chose hot pink, lime green and Zebra print.  I know, I know, I'm sure that seems a bit unusual for a baby's room, but once you see the comforter I found you'll understand and hopefully agree that it looks cute.  Plus I figured it would be something she could grow with for a few years.  Here's my end result:

lime green, hot pink and zebra baby girl nursery


My favorite part of the collage over her crib is the black frame with the "J' in it.  I got that on clearance at Hobby Lobby and I believe it was less than $10.  The sign hanging by the pink ribbon is also from Hobby Lobby and I bought scrapbook stickers that say "It's All About Me" on them, which are tough to see in this picture.  The picture with the words on it is from Walmart, $5!  The three items along the right side I made.  The top pink circle is just a piece of craft wood with her picture Modge Podged to it.  The middle piece is a canvas wrapped in zebra cloth.  The word Princess is made in wood and bought from the craft store for a few dollars.  I spray painted it hot pink to match.  Last but not least, our butterfly foot print.  I took her feet and dipped them in paint, then put them on the canvas.  

Everything in the collage is a PIN except for the wood with the picture and the butterfly print, those two items get a PASS!  The wood with the photo only gets a PASS because of the way it came together based on what I used.  I should have either cut the picture into a circle or bought a square piece of wood.  I think it just looks a bit awkward the way it is now.  

The butterfly picture while adorable was nearly impossible to do.  It took 3 tries before I got it to this and I'm still not totally satisfied with the end result.  The second I would put the paint on her feet she would squish them up because it was cold, so it made it impossible to get a good foot print.  As soon as I'd push them on the canvas she'd inevitably squish her toes again and ruin the print.  Cute idea for an older child, but not practical for a newborn, so PASS on this one.  

So that's the focal point of her room, the crib and the collage above it.  Stay tuned for my next post...DIY wall art for a baby girl nursery.
 

Pin It