Wednesday, December 18, 2013

Decorating with Holiday Cards

Every year, we as Moms and wives will move mountains to get a good Christmas picture.  We coordinate outfits, make sure hair is done and shoes are clean.  We get that perfect shot, plop it on our Christmas, mail it out and that's it, done for another year.

Well I came across this idea on Pinterest and thought it was a great way to display those beautiful Christmas cards we work so hard for.  Here is my inspiration:

Decorating with your old Christmas cards
Originally found at Indulgy.com
AND

Use old Christmas pictures and cards with garland to decorate a railing
Originally found at Ashley Winn Design


I just so happened to a have a railing just like this one and I actually liked the way the finished product from Indulgy.com looked so I followed that one most closely.  

I went to Michael's and bought some craft wood.  Each piece was just a little bigger than the size of my Christmas cards.  Then I got some holiday scrapbook paper.  I had glue and ribbon at home.  I forgot to take a picture of all my supplies before I used them (sorry I'm cramming a lot into this holiday season!).  

I wrapped each board in a different piece of scrapbook paper.  I used a stapler to secure it since the paper is a bit heavy I wasn't sure if glue would stand the test of time.  I wrapped them like you would a present.  Then I took Modge Podge and mounted each photo on.  Once they had a minute to adhere, I put a coat of Modge Podge over the entire thing to seal it.  I let them dry over night and drilled a hole for the ribbon the next morning.  

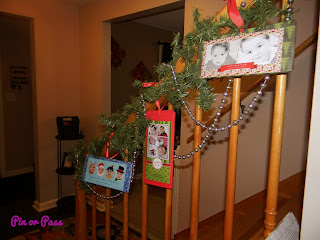
Here's my end result:

Use past Christmas as holiday decor

Use past Christmas cards to decorate for the holidays

Overall I was happy with these.  I may change up how I do this in the future but I like the general concept.  I also may use their photos with Santa too.  I got the wood and scrapbook paper from Michael's and both were on sale.  I maybe spent $5 on this project.  It was easy, inexpensive and came out nice...plus each Christmas I am able to see how my family has grown and changed!  So, with that start saving your Christmas cards because this gets a PIN!


Pin It

Monday, December 2, 2013

A Holiday Gift Basket Idea Inspired by Pinterest

Whether it's your kid's school, a gift exchange or a donation, every holiday you always get that one request for a gift basket, am I right?  This year I was asked to do a donation in the form of a gift basket for a raffle at my son's pre-k.  I was sick of doing the old "movie night" basket or any of the other traditional gift basket ideas so of course I went to Pinterest.  

I had no idea there would be so many ideas!  I didn't think gift basket themes were such a popular topic of discussion but it turns out they are!  Visit my gift ideas board to see some of the cute ideas I found.  

I didn't really find exactly what I was looking for but this basket jump started my creative juices.

Originally found at Harmon Raffle Baskets
I liked the idea of a Christmas themed basket but I wanted to use one of the remaining black pashminas I had from my sister's shower (see how I used those in this post) among several other new items I had bought and never used for what I intended.  I was thinking about all the things that happen during the holidays and it clicked....holiday parties!  There is always at least one if not more to go to and you're always worrying about how you're going to look, so the Winter Glam basket was born!

Here's the end result:

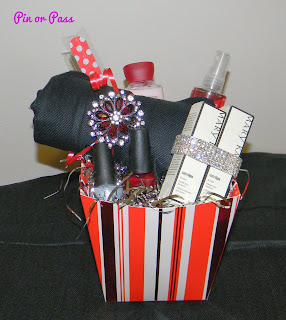
holiday glam basket for a basket raffle donation


The basket contained:
  • A black pashmina scarf
  • A scarf pin
  • 2 OPI holiday nail polishes
  • A travel size lotion and body spray from Bath & Body
  • A lip mask and lip balm from Mary Kay
  • A faux diamond bracelet
  • A nail file
I wrapped it up and put some nice ribbons on it but left them off for the picture so you could see the contents.  With this project, I don't really have a pin to rate pin or pass, but the idea of using Pinterest for gift basket ideas gets a PIN!  

Pin It

Sunday, November 24, 2013

Thanksgiving Turkey - A Kid Craft

If there is anything I've learned in my four short years of being a parent it's that if you want to keep your kids out of trouble, and by trouble I mean not tearing apart your house, you've got to find ways to occupy their little minds.  Sometimes life gets in the way and you can't always be super Mom but some days the planets align and you get to wear your cape!  I'd been seeing some cute Thanksgiving crafts on Pinterest so I decided we'd try one.  Here was my inspiration:

handprint turkey
Originally found at Preschool Crafts for Kids


I of course did not plan ahead to do this so as I started gathering my materials together, as both of my kids were screaming, and realized I had no paper plates.  Not a problem, I improvised and grabbed an empty diaper box.  Instead of having to color the plate we got to skip a step cause the box was already brown.  
thanksgiving handprint turkey craft - supplies
Starting supplies for our Thanksgiving Turkey Craft

For those of you that don't know, I have a 4 year old and a 1 year old.  They are both VERY busy bees so I had to move quick!  I traced their hands on different colored construction paper and let my 4 year old cut them out (he's big on using scissors these days because he's learning about cutting on the line at school).  In the mean time I cut a circle out of the turkey and made a part that would be his body.  


Cut out handprint to use as turkey feathers
Giovani cutting away!

Next I had my 4 year old start gluing which he also loves to do.  We added googlely eyes, a gobbler and a hat (as per Gio's request) and here's the finished product.

Handprint turkey - Thanksgiving Kid Craft


This was easy and cheap.  Best of all it took us two mornings before pre-k to finish so it kept him busy for a bit.  PIN!

I've got a lot of projects in the works so I'm not sure what will be up next, so just stay tuned for more!  
 

Pin It

Tuesday, November 12, 2013

A Week of Pinterest Recipe Reviews

Although I typically review project type pins, I do rely on Pinterest regularly for recipes and meal ideas.  This past week I did quite a few recipes and I wanted to share the outcome with you.  My disclaimer...eating healthy was not at the forefront of my focus this week and all my recipes selections reflect that LOL.  

My first inspiration...a whole chicken in the crockpot!

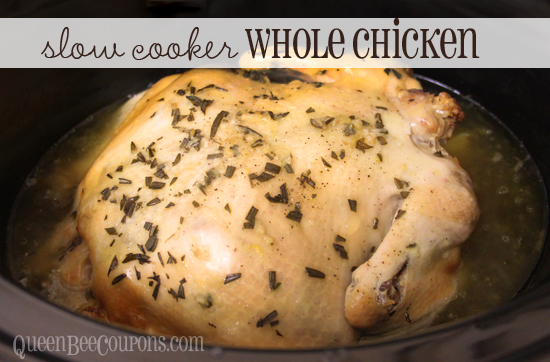
whole chicken cooking in a slow cooker
Originally found at Queen Bee Coupons


I love cooking a whole chicken because I can usually get two meals out of one.  I usually take the left overs and make chicken fried rice.  Add some store bought egg rolls and you have a meal!  Anyway I followed the original pinners instructions exactly adding a little olive oil as she did, etc.  My chicken cooked A LOT faster than hers.  It was done in about 4 hours.  The meat itself was good but one thing I couldn't get past was the soggy skin.  When you roast a whole chicken in the oven the skin gets nice and crispy.  Even though I personally don't eat the skin, its more aesthetically appealing to me and the chicken isn't dripping with juice, it's just right.  While the chicken came out as she said it would, this pin gets a PASS from me.  For me, there is no substitute for oven roasting.

Next up...crack potatoes.  This is one of those recipes I've pinned multiple times and it took me months to finally make it.  Here's the pin:

recipe for a potato dish called crack potatoes
Originally found at Plain Chicken
I followed the instructions exactly.  I divided it up into two larger pans instead of three smaller.  Overall it came out good but if I make this again, I'm going to try adding a little less ranch seasoning.  If that doesn't fix it, I'm going to cut back on the sour cream.  There was an over powering punch from one of them that I need to scale back but couldn't put my finger on which it was.  PIN.

It was a busy week of cooking.  I don't know why I crammed so many of these into one week...anyway.  Next up,  loaded baked potato casserole.  

recipe for a casserole  - loaded baked potato
Originally found at Red Star Recipe

Again, the outcome was good.  If I make this again, I'll use less potatoes and add more bacon and cheese.  PIN

Last one...the Italian Wonder Pot.  This one is simple.  PIN!

recipe for a dish called the Italian Wonder Pot
Originally found at Budget Bytes
That was our week.  We had leftovers from each of these that made nice lunches the following day.  Next up, a Thanksgiving craft to do with the kiddies and a basket idea for a holiday basket raffle.  Stay tuned!


Pin It

Sunday, November 3, 2013

DIY Halloween Costume - Miss Piggy

I always do projects that I find on Pinterest and re-create well today's post is different!  Today's post is my first original project that I did not find on Pinterest.  I wore this costume for the first time several years ago, long before Pinterest was around.  I'll admit, I did see someone else do a version of it while Googling for costume ideas, but I took it to the next level LOL.

So, I wanted to be Miss Piggy.  I've always been a fan of her.  She's funny, loud and always looks glamorous despite the fact that she's a pig LOL!  Here was my inspiration:

Miss Piggy
Originally found at Land Lord Rock NYC

I went to a costume store and bought a standard blond curly wig and some pig ears.  I also bought some fake eyelashes from Wal-Mart.  I searched high and low for the right snout (because the nose you choose will make or break the costume).  If you look at Miss Piggy's nose it's pretty big.  If you do a quick Google you see some others that have attempted to pull off Miss Piggy but they didn't nail the nose.

Originally found at Coolest Homemade Costumes - perfect example of not nailing the nose. 
So I went online and found the perfect nose.  I added a lot of makeup and some clothes I already had.  Then I course topped it off with a hot pink feather boa that I also already had.  Here was the final result:

Miss Piggy costume

I was really happy with the way it came out.  The day was a little hectic because my kids were excited and I forgot to get a shot of my full outfit, but this was the most important part anyway.  This was a great DIY costume and I may even wear it again next year!

Up next, I'm making a few things for my house and up-cycling some jewelry so stay tuned!


P.S. - In case you are wondering, that cute little hippo with me is my daughter.  She was the "Huggable Hippo" this year!

Pin It

Saturday, October 12, 2013

DIY Fruit Cleaner

Ok, let's talk about cleaning fruit.  I know, not the most exciting project, but an important one.  I always used to just rinse my fruit under water until recently when I started learning more about all the crap that they put on it.  So I came across this pin referencing a DIY Fruit and Vegetable cleaner and gave it a try.

Inspiration:

Sink full of fruit - DIY fruit and veggie cleaner
Originally found at A Pretty Life
I didn't want to wash the fruit in my sink as the original post suggested so I bought a bin at the Dollar Tree, about the size of two shoe boxes side by side and used that.  I filled it with luke warm water and added the recommended amount of vinegar.  Let the fruit soak and rinsed.

This post said you'd know they were clean because the water would be dingy but I didn't see that.  My water looked normal with the exception of a few little floaties here and there.  When I drained the water it was still clear.

With that, while she was right that the fruit did not have a vinegar taste, I'm not sure it actually got my fruit that clean so this pin gets a PASS.

Do you have a good method or product for cleaning fruits and veggies? I'd prefer something that is DIY instead of a product to buy but please share either in the comments.  I'll try some and do an updated post!


Pin It

Sunday, October 6, 2013

Decorate your TV

Wow I have been MIA!  With the start of school we've been getting used to a new schedule and with a full calendar on top of that, I haven't had time to do many projects.  The good news is, things are falling into place and I should be able to get back to business soon. While I have been busy, I have found time to sneak a few things in and here's one of them.

Here's my inspiration:

Picture frames with decorative metal art over it
Originally found at Home Decor Online
I really like those metal scroll designs and always seen them at my local Kirkland's I just didn't know what to do with them.  But this gave me an idea...so I went to Kirkland's and picked one up for $14.99 (total steal!).

Here's what I did with mine:

TV with metal wall art above it

The wall my TV hangs on is a bit bare so I added the metal scroll art to dress it up.   It just added a little something but I was happy with the way it came out.  Adding metal scroll art to fill in blank wall space...PIN!

Coming soon...Halloween inspired by Pinterest.  

Pin It

Monday, August 26, 2013

Shellac Hack

I LOVE gel (also called Shellac) nail polish!  There is nothing better for a Mom like me.  It lasts for days without chipping and you don't have to worry about your nails looking horrendous for a good week to two weeks after getting them done.  The problem...gel manicures are expensive.

So, when I saw this post, I was on it!

diy gel manicure
Originally found at howshesparkles.com
I have a ton of OPI and Essie polish so I just went out and got Hard as Wraps and the No Chip top coat.  I looked at Target and Walmart with no luck and ending up finding them both at Walgreens.  I spent around $10.

I followed the instructions and started out with clean, dry hands.  I did one coat of Hard as Wraps, then two coats of my favorite polish which happens to be by OPI.  Followed it up with one coat of the No Chip top coat.

They looked great...but less than 12 hours later, yes that's right I said 12:

diy gel manicure gone wrong


diy gel manicure gone wrong

CHIPS on both hands!  The right hand was far worse than the left but there was a pretty sizable chunk out of the left hand's middle finger that is hard to see in this picture because of the glare.

I had high hopes for this one.  I thought I wouldn't see a manicure table for months!  This was an epic waste of $10. So the moral of this post is, in the case of gel nail polish, you get what you pay for.  Save your $10 and put it towards your next mani.  TOTAL PASS!

Pin It

Sunday, August 18, 2013

Vanity Organizing Pinterest Style

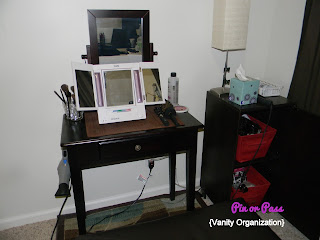
A while back I did a post on organizing my linen closet and it's gotten a number of repins on Pinterest so I decided to do a second post on the topic organizing since it seems popular!  Here goes...I don't have a master bathroom so my space to get ready each day is limited.  I bought this small vanity that I keep in my office so I can get ready without someone climbing over me to get in the bathroom!  The problem is it is always messy so I decided to organize it a bit.  Here's what I started with:

Messy Vanity

Here's my inspiration for cleaning up this mess!

DIY - Makeup brush storage
Originally found at Liz Marie Blog
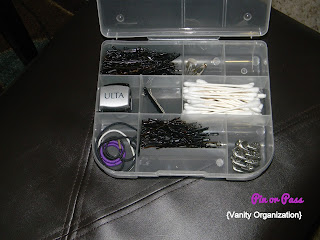
I know it doesn't seem like a lot but I took a few of the things I did in previous organizing posts and used them here as well.  First, I bought a craft organizing box from the Dollar Tree to clean up my bobbie pins, q-tips, etc.  Like in previous posts, I used bins to organize stuff in my drawers, then used this smaller storage for further organize the bins themselves.   

vanity organization using a plastic craft storage box

vanity organization using a craft storage box

Then I added a Command hook to the side of my vanity to hang my blow dryer up.  It was annoying being on the floor all the time.  You see Command hooks used a lot in various ways on Pinterest.  

vanity organization with Command hooks

Last, I got a glass jar from the Dollar Tree and filled it with flat decorative marbles I had laying around my house.  I didn't quite as fancy as the original poster did with decorating her jar.  I just didn't have the time and needed it function rather than look fancy!  Maybe I'll spruce it up one day.

vanity organization - DIY makeup brush storage

Here's my end result...a cleaned up, organized vanity!

vanity organization


Overall I spent $2 on this project!!! Which is totally great, so this gets a PIN.  I hope you enjoyed my ideas for vanity organization and it gave you some ideas to get your own vanity or makeup area in order!  


Links to previous organizing posts in case you missed them!


Pin It

Tuesday, August 13, 2013

Unique Bridal Shower Favors and More Inspired by Pinterest


So true!  Luckily for me, I have a younger sister who is engaged and getting married in October so while I can't have the Pinterest inspired wedding of MY dreams, I can sneak some of my stuff into her upcoming event!

As the Maid of Honor, I was in charge of the bridal shower so of course I turned to Pinterest for inspiration.  I found a TON of stuff!  With my budget in hand I got to work on figuring out what I could implement.  Here is my inspiration, (get ready there is a lot):

Invitations:
Couture Wedding Dress Bridal Shower Invitation
Originally found at Zazzle.com

Centerpieces:
cupcake flowers
No original website was found just random picture in cyber space!

Purple and gold floral arrangement
Originally found at bollea.com

Wedding Centerpiece
Originally found at efavormart.com


Black cake with purple scrolling
Originally found on Flickr


There was a million more, so if you'd like to check out the whole board, visit my Pinterest page and visit the board I set up for her.

First things, first, invitations!  They set the tone for the whole event and the ones above were perfect!  I went to Zazzle and ordered them.  Zazzle is very easy to use and reasonably priced.  The only problem was the increments they came in, I had to buy more than I needed but that was ok.  I don't have a picture of our finished product but they look exactly as the inspiration above and came out great, PIN!

Onto the centerpieces!  These were not as easy.  I originally wanted to do wine glasses upside down with candles on top (see my board for pins) as a means of doing an inexpensive DIY centerpiece that looked really cute, plus the Bride loves wine!  However, the venue wouldn't let us use their glasses in case wax dripped so we had to move to plan B.  

I saw those beautiful cupcake flowers and considered doing a cupcake bouquet as a centerpiece for each table.  I thought it would be great because I could take care of the centerpieces and cake in one shot.  No such luck!  After two bakers and several attempts at putting the cupcake vases together (more pins on my site for this one too), I gave up.  They just weren't coming together like they were on Pinterest, cupcake centerpieces get a PASS!  

Plan C, flowers!  I used a combination of two of the inspiration photos above and came out with this:


They looked really nice, but they were by no means a DIY job.  We had to enlist the help of our local florist.  We supplied the vases and the bling band and she put together the flowers.  Overall this gets a PIN but if I had to do over I would have tried to find something a bit more unique.  

Onto the cake...the best part of the whole event!  Our colors were black, shades of purple and silver.  I saw the cake I listed in my inspiration and wanted it!  The bakery we used advised against it.  She said if she used fondant the cake wouldn't look as nice when people went to eat it and if she used black icing it could turn everyone's teeth black...so we skipped the black cake and got this!

Bridal shower cake

So our cake was still Pinterest inspired, it looked great and tasted even better.  Using Pinterest for cake decorating inspiration....PIN!  Following it to a tee and turning your guest's teeth black...PASS!

Last but certainly not least my favorite, the favors.  I saw the idea to tie a scarf around a chair and use it as a favor when she first got engaged.  When we decided to do the shower in August I was hell bent I was doing scarves since Fall was just around the corner.  I found a distributor online that sold them in bulk so I got a GREAT deal on them.  I spent no more than I would have doing a nice box of chocolates or a wine stopper or something like that AND the Bride always wears scarves.  The venue we used supplied chair covers so they basically acted as sashes.  Here's how they looked:

black scarf used as a chair sash

LOVED THEM!  They looked really cute across the whole room and it seemed like everyone liked them alot.  This Pinterest idea is a definite PIN!  

Finally...the Bride and her cake!


Thanks everyone, I hope you enjoyed this one.  It was a long time in the making and I finally pulled it all together.  If you would like more information about anything you seen here, please don't hesitate to contact me via email.  


Pin It

Monday, August 5, 2013

Guest Post - Pinterest Inspired Bathroom Lighting

Today's guest post comes from Bethany in North Carolina. Her husband is my cousin!  He does amazing wood work which you'll see in the form of a bathroom vanity in this post and they are always doing awesome DIY projects.  If you'd like more information about him or products visit http://thewoodstudio.us/.  Now on to the post!

Guest post by Bethany:

We are in the middle of a huge bathroom remodel, and I have been debating every, single detail over the past couple months.  I’ve had this DIY light tutorial on my Pinterest board for a while, and after purchasing some standard pendant lights, I decided to dive in and make these to go in the new bathroom/vanity area.

Now, I am REALLY not electrically skilled, but using the tutorial I got through this with almost no help from my (very talented) husband.  Using the hand pipe cutter was a workout for all the cuts, but it is easy and safe, compared to me using power tools.  Really all there was to it was cutting the copper and putting it together, stringing the light cord through, and drilling the wood to attach the copper with the tube straps.  I did stain the wood before putting it together, but that is totally optional (and easy when there is a wood shop in your backyard J).
My husband hard-wired these lights for us, but the light kit came equipped to just plug in and turn on/off with the switch in-line on the cord.
Copper Pipe Wall Sconce
Originally found at Camille Styles


Cost:  Before I decided to make the lights myself, the simple pendant lights I had bought were $20 for the cord kit, and $12 for the shade.  I thought I had a SCREAMING deal there at $32 per light.  Though they were pretty boring looking…

The cost for my copper pendant goes as follows:
Cord set (you can buy these to hang pendant lights, got mine at World Market) - $12.99 each
1/2” copper pipe (5 ft piece made 2 lights) - $7.75
½” copper elbows (2 per light at 75cents each) - $3.00
½” copper tube straps (2 per light, bought a 5 pack) - $2.30
Some things we had on hand:
Wood screws
4” x 12” piece of wood (cut to two pieces)
Light bulbs
Pipe cutter (you can buy these for about $7)

So all in all, we spent just under $40 on both lights and they are WAY more custom and interesting than the $64 in pendants I returned.  Fair enough, my husband having a wood shop made the project easier, but still an easy DIY project.
Description: Bath2

I LOVE the custom, rustic look of these lights, and I feel pretty good about making them myself.  The ability to swing the light side to side and raise and lower the cord length is a great feature.  Without a doubt, this project gets a PIN! I was intimidated when I read the instructions, but it is a totally doable DIY project.

I hope you enjoyed this guest post by Bethany.  If you or anyone you know has some Pinterest projects they'd like to share please email me at jcalero1015@yahoo.com.

Up next....a wedding shower with Pinterest inspired elements!


Pin It