I found this pin from Our Family Four and I was IN LOVE with the original pinner's end result. It looked unique and it fit perfectly with the room I was focused on. The pin had fairly detailed instructions so I thought it would be an easy project.
 |
| Photo from Our Family Four's blog post |
I bought a mat from Target on clearance for $7, two pieces of wood from Lowe's for around $30 and then I used stain and spray paint we already had at home. So I it was roughly $40 to start. A little more than I'd typically spend on a DIY stuff but I loved the project so much I didn't mind.
My husband stained the wood and taped off the edges for me. Then I placed the mat in the middle and sprayed away! I let it dry in between each coat and did 4 coats total. I was so excited to pull the mat back and see the end result...imagine my disappointment when it look TERRIBLE!
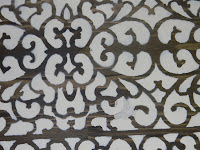
The lines were not clean, the paint had smudged in places and overall the pattern of the mat just wasn't has nice as the original pinner's. I sited heavy coats of paint and my mat pattern as the problem in my first stab at this project.
Determined to have this in my living room, I invested in a new mat, another $20 at Target. I flipped the boards over and taped them off again. Before starting, I went back to the original blog and read the directions again. In my first attempt, I missed that the original pinner had taken an exacto knife and cleaned up the mat. If you take a close look at your rubber mats you'll see that there is excess plastic throughout the lines of the design and it is jagged in places. When using it as a stencil it would make the lines less clean.
I sat down with an exacto knife and trimmed all the excess plastic! I can't even tell you how long this took...let's just say it's hours off of my life that I am never getting back LOL! Anyway, again, I was vested in making this come to life so I went at it again.
This time, I did four light coats of spray paint and allowed more drying time in between. I let it dry over night before I removed the mat. I pulled back the mat and was yet again disappointed. It was better than the first attempt but still not good enough for my living room wall.
You can see even after all my exacto work, the lines still weren't overly clean and despite the added drying time, paint still smudged. Overall it just didn't look that impressive. I spent a lot of time and money on this project. It was time consuming and after two failed attempts, I was out of wood and had to give up. So, even though I absolutely LOVED the original pinner's end result, I have to give this pin a PASS.
In future posts, I'll recycle the wood and mat into other projects I seen on Pinterest. Stay tuned!
From our family to yours, Merry Christmas and Happy New Year!


Can you just get some dark brown paint and touch it up?? I have LOTS of imperfections in my projects, but people who look at it are so impressed that they barely notice the imperfections...maybe after you touch it up you can do a light sanding to make it look "weathered"?? I think it does not look as bad as you think it does!! :)
ReplyDeleteThanks Karrie ;-) I thought about trying to clean it up with some paint remover on a small brush but I didn't want to strip the stain. Brown paint might work but to be honest, I don't want to invest more time in this one in case it doesn't work hahaha. Besides I already bought some stuff to recycle the wood into another project.
ReplyDelete