Monday, July 22, 2013

Birthday Balloons Inspired by Pinterest

I know this post won't appeal to everyone as not all of you have Ninja Turtle lovers but these could also probably be made to work with some super heros.  Any way, my son turned 4 last week (tear...he's getting too big)  and he wanted a Ninja Turtle themed birthday party.  I did the usual and bought the table cloth and cake plates and of course a stupid $20 pinata.  For balloons, I saw a really cute idea on Pinterest I wanted to try.  Here was my inspiration:

DIY Ninja Turtle Balloons
Originally found at Do It and How
I got green balloons, streamers and a helium tank (just one of those little disposable ones from the party store).  In stead of making paper eyes I bought google eyes from the dollar store.

I blew up each balloon and tied the streamer to fit.  Then I glued on the google eyes with craft glue, drew the mouths on with a sharpie and bam, they were done!  They were super easy and didn't take long at all. Thankfully they were quick because I tried to do them the night before the party and they were deflated by the morning so I had to re-do them right before everyone came.  

If I had to do this one over again, the only thing I would do different is secure the streamers to the balloon better.  The static from the balloon was keeping them in place while they were in the house but when they got outside and a little breeze came by the streamers slipped off.  I had to put them back on several times throughout the day and finally mid-way through the party I gave up.

I got so wrapped up in getting things done for the party I forgot to take a picture of my finished products but they basically looked exactly as the inspiration with google eyes.  They were cute, quick and cheap!  PIN.


Pin It

Sunday, July 14, 2013

Easy DIY 4th of July Shirts

I planned to do these BEFORE the 4th of July so I could post about them and give you a chance to do them for the holiday...but it didn't work out that way.  We made these July 3 and they were dry in time to wear the next day.  Anyway, this was a good project so mark your calendars for next year!

Here's my original inspiration:

4th of July Shirts
Originally found at CraftyErin
I got my son's shirt from Walmart for $4 and I used a onsie I already had for my daughter's shirt.  I also bought the shirt paint at Walmart.  They were the cheapest out of the craft stores.  The paint cost about $6.  Here's what I did:

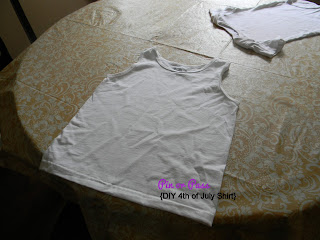
I laid both shirts on a flat surface and spread the blue paint for the hand prints on a paper plate.

Making of 4th of July Shirt

Making of 4th of July Kid's Shirt

I dipped each of the kid's hands in the blue paint and made the hand print.  Doing it with my little one, who is almost a year was a little tough.  She kept making a fist with the paint on her hand and it was hard to get her to spread her fingers nicely so this may be something better for older kids. 

Making 4th of July Kid's Shirts

Next I took a paint brush and painted the stripes.  If the kids were older I would have let them do this but I knew it wasn't going to go well with my two.  I wanted to personalize them a little further and put their names on them.  I started with my daughter's because she had another outfit to wear if it didn't turn out hahaha.  I wasn't happy with the way her name came out.  I used a fabric marker and the onsie was hard to write on so I didn't bother trying to put my son's name on his.  

Here's the end result:

Kid's 4th of July Shirt

Baby 4th of July Shirt

I really liked the way the tank top came out.  The onsie would have been good too if hadn't tried to add the name but it was still cute.  This project was really easy and something quick and easy to do with the kids.  I only spent $10 which is probably what I would have spent had I bought them t-shirts so this project gets a PIN!  

My son wouldn't let me take his picture by my little lady did!

Julianna in her 4th of July shirt

Julianna in her 4th of July shirt
  
Up next...I tested out some ideas for a Ninja Turtle themed birthday party!  


Pin It

Monday, July 8, 2013

Crockpot Creations - Part 2 of 2 with a Guest Post by Joanna

Today we continue our quest to find Pinterest crockpot recipes that are actually worth trying.  We have a great guest post from a friend of mine, Joanna.  Joanna is a very busy newlywed, that has a ridiculous commute to work everyday!  She uses her crockpot to have meals ready when she gets home so she doesn't have to spend all night in the kitchen!

Guest Blogger:  Joanna

Hello everyone in the Pin or Pass blogosphere!  My name is Joanna.  I'm a scientist by day, foodie by night, and a Pinterest addict during my train commute home (...and lunch break at work, and down time before bed..). Well, you get the picture.  When Jenn was looking for a guest blogger I jumped at the chance.  I love searching Pinterest for new recipes to try on the weekends.  I have two boards I keep for myself:  "test kitchen-repeat" and "test kitchen - no repeat."  Or as Jenn likes to say, "Pin or Pass." I hope my incite into Pinterest popular recipes can be helpful to all of you!


Three things drew me to this pin.1.  I love my crockpot .2.  Sweet and spicy is an amazing combination.3.  Garlic.   Lots of garlic. 


The fact that this recipe possessed these three qualities put the pin directly onto my "yum" board."  I love to cook dinner for my husband and I.  However, my days are long, I'm talking 15 hours long (on a good day).  So when I find a recipe that utilizes the crockpot and is guaranteed to give me a few nights worth of dinners I'm usually sold.  


This pin was originally found on Six Sisters Stuff. Here's what it should like:
Originally found at Six Sisters' Stuff


I had all of the ingredients in my kitchen except for the soda, which was a quick fix; so it was a great recipe to give a try on a Sunday.


Ingredients* 4-6 chicken breasts ($3.00)                           - I only had 3 on hand and I think the quantity was fine * 1 cup packed brown sugar ($0.48)                - I used light brown sugar * 2/3 cup vinegar ($0.94)                                  - I used red wine vinegar  * 1/4 cup lemon-lime soda ($0.06) * 2-3 Tablespoons minced garlic ($0.86)* 2 Tablespoons soy sauce ($0.21)* 1 teaspoon fresh ground pepper (freebie)* 2 Tablespoons corn starch ($0.12)* 2 Tablespoons red pepper flakes (freebie)    - optional  Total Cost - $5.67 
* Served over rice, I got about 6 servings out of this recipe.  Your serving sizes may differ.  Cost per serving - $0.95


Instructions1. Spray slow cooker with non-stick cooking spray. 2. Place chicken (frozen, thawed or fresh) inside slow cooker. 3. Mix together brown sugar, vinegar, soda, garlic, soy sauce, and pepper together. 4. Pour over chicken. 5. Cook on low for 6-8 hours or high for 4 hours. 6. Take chicken pieces out of slow cooker and pour remaining sauce into saucepan. 7. Place saucepan over high heat. 8. Mix together corn starch and water, pour into saucepan, and mix well.* Note: no specific amount of water was given.  I kept adding water to the cornstarch by the teaspoon until the cornstarch was completely dissolved.  I ended up adding 8 teaspoons of water , which is equal to 2 2/3 Tablespoons. 9.  Let sauce come to a boil and boil for 2-3 minutes, or until it starts to thicken and turns into a glaze. 10. Remove from heat and let sit for a minute or two (it will continue to thicken as it cools down). 11. Sprinkle red pepper flakes on top if desired.  

Since I had almost all of the ingredients on hand I don't have an exact total of what I spent on the ingredients.  Here's the end result:

Crockpot garlic and brown sugar chicken
The finished product!

This recipe was super simple, delicious, and a crowd pleaser.  When adding the red pepper flakes it definitely reminds me of one of my Chinese food take-out favorites, Chicken in Garlic Sauce, at a fraction of the price!  This gets a PIN! 


Thanks Joanna!  Next up...it's an exciting time at the Calero house.  My main man, Gio, is turning 4 in a few weeks and we are preparing for a Ninja Turtle themed birthday party. My little lady, Miss Julianna, is turning 1 so I'm working on some fun picture ideas and a Minnie Mouse themed birthday.  Stay tuned for more.  If you have a guest post you'd like to submit please email me at jcalero1015@yahoo.com.  


Pin It

Tuesday, July 2, 2013

Crockpot Creations - Part 1 of 2 with a Guest Post by Kristina

Even though it's Summer, crockpot meals are a great way to have dinner ready in a flash without a lot of work.  As you scroll through Pinterest you always see these amazing dishes that look like they are straight out of a food magazine and think to yourself "boy that looks good."  You run out to the store, buy all the ingredients, put it together and wait 8 long hours while it cooks in your crock.  How many of you have come home to a pile of mush in your crockpot?  I sure have, so today is part 1 of a 2 part post testing crockpot recipes found on Pinterest, let's see how they go!

First up is Kristina, she tried crockpot Lasagna.  Now before I proceed, I'll tell you Kristina is my cousin.  Our Grandma is quite possibly the best Lasagna maker around so as she is reviewing this recipe she's holding the results up against Grandma Malfa's Lasagna.
 
Guest Blogger:  Kristina

Hi Everyone!  I found a recipe for "Slow Cooker Lasagna" from Taste of Home on Pinterest.

crock pot lasagna
Originally found at Taste of Home 


I have a 4 qt. crockpot that I used to make this.  I altered the recipe a bit and used:


  • 1 lb. of ground meat (whatever you like, I've used beef, venison, & turkey)
  • 1 small onion
  • Garlic
  • 1 pkg lasagna noodles-not the 'no bake' kind, just regular
  • Cheeses & sauce-I started using the Great Value brand Italian mix,  it has 4 or 5 cheeses in it, & I didn't measure the cheese like they suggest, I just put in what I wanted!


Start by cooking your meat in a frying pan with one small onion, EVOO and garlic.  

Then put sauce on the bottom of your crockpot so it doesn't stick.  Layer sauce, meat, noodles, & cheese, with extra sauce & cheese on top.

Pour about 1/3 cups of water in for some moisture.  Cook on low for 8 hours and enjoy!  I thought this came out great.  It wasn't as neat as the picture, but it tasted good, was easy to make and inexpensive.  PIN!


Up next...part 2 of Crockpot Creations with a guest post from Joanna who tried Slow Cooker Garlic and Brown Sugar Chicken...sounds delish!


Pin It